
If you love bead weaving and want to create a statement beaded ring that shimmers with crystals, this project is perfect for you! In this step-by-step guide, you’ll learn how to combine ladder stitch, fringe, and peyote stitch into one sparkling bauble for your hand. Whether you’re a beginner looking to expand your skills or an experienced beader wanting a new project, this crystal ring will be a showstopper.
Materials & Tools You’ll Need To Create
- 3 g silver-lined crystal size 11° hex cylinder beads
- 15 Pacific opal 4mm crystal bicones
- 15 fuchsia AB 6mm crystal rounds
- 1 peridot 8mm crystal round
- Crystal 6-lb FireLine braided beading thread
- Scissors
- Size 12 sharp beading needle
Step-by-Step Beaded Ring Instructions
Step 1: Create the Base Ladder Stitch
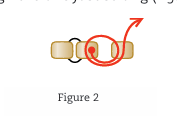
Cut 5 feet of thread and string 2 size 11° cylinder beads, leaving a 4″ tail. Pass through both beads again so they sit side by side. This begins your ladder-stitched strip.

Step 2: Build the Ladder
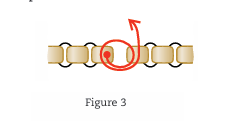
String one more size 11°, pass down through the previous bead, and up through the new one. Continue until you have a strip of 15 beads. Join the ends to form a circle. The tail thread exits from the bottom, while your working thread exits from the top.
Step 3: Add the Center Crystal
String the 8mm peridot round bead and position it in the center of your circle. Secure it by passing through opposite cylinder beads and weaving back through until it’s anchored firmly.

Step 4: Embellish the Base
String 5 cylinder beads, skip 2 beads on the base, and pass up through the next bead. Then pass back through the last added bead. Continue around, creating decorative loops. Tighten the beads around the 8mm center bead.

Step 5: Add the Crystal Fringe (Bicones)
String 1 size 11°, 1 bicone, and 1 size 11°. Skip the last seed bead, then pass back through the bicone, the first seed bead, and into the base circle bead. Repeat all the way around until you have 15 bicone fringes.

Step 6: Add the Crystal Fringe (Rounds)
Start a new thread. String 3 size 11°s, one 6mm crystal, and 1 size 11°. Skip the last seed bead and pass back through the crystal and the first three seed beads. Secure by looping under the base thread. Repeat to add 15 crystal fringe legs.

Step 7: Connect the Fringe
Using a fresh thread, weave through the bicone fringes, joining them together with seed beads. Repeat for the 6mm crystal fringes, connecting them with 4–6 seed beads at a time. Reinforce by passing through the beads again. Your sparkling ring top is now complete.
Step 8: Weave the Peyote Band
- Rows 1–14: Using 5 feet of thread, peyote-stitch a band 12 beads wide and 14 rows long.
- Rows 15–16: Decrease at the start of each row so the strip narrows to 8 beads, forming the ring top base.
- Continue peyote stitch until the band fits around your finger.
- Work the opposite side of the strap in the same way until both ends interlock.

Secure and trim your threads. Attach the finished band to the ring top.

✨ Congratulations—you’ve made your handcrafted crystal statement beaded ring!
Why You’ll Love This Project
- Combines three classic stitches into one design
- Creates a bold, sparkling bauble perfect for gifting or wearing
- Great for practicing advanced bead weaving techniques
- Fully customizable with your favorite crystal colors
Beaded Ring Designs. Take A Look These 3 Amazing Easy Tutorial for Beginners!