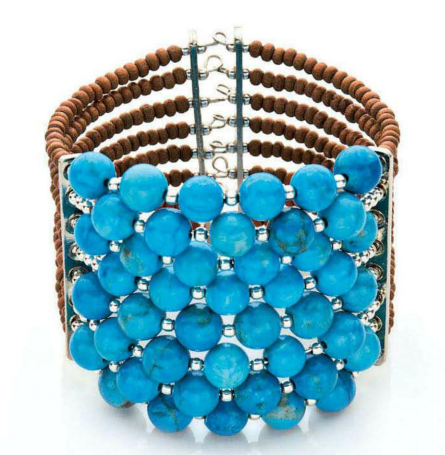
Looking for a bold DIY jewelry project that mixes natural wood, vibrant turquoise, and shiny silver-plated accents? This step-by-step memory wire bracelet tutorial is perfect for beginners and seasoned beaders alike. The finished size is about 8 inches, and with its stacked multi-strand look, it’s a showstopper.
Materials You’ll Need
- 368 wood rondelle beads, 3x2mm
- 44 turquoise round beads, 8mm
- 116 silver-plated round beads, 2.5mm
- 4 silver-plated 8-strand spacer bars, 5×46mm
- 10 loops of silver-plated large bracelet memory wire
- Memory-wire cutters
- Round-nose pliers
- Flat-nose pliers
Step-by-Step Instructions Wire Bracelet Tutorial
Step 1: Prepare the Memory Wire
Cut 8 complete loops of memory wire, leaving the ends to overlap by ¾”. Using round-nose pliers, form a simple loop at one end of each wire to secure your beads.
Step 2: String the First Layer
On the first wire, thread:
- 1 silver bead
- First hole of 1 spacer bar
- 1 silver bead
- 23 wood rondelles
- 1 silver bead
- First hole of another spacer bar
- 1 silver bead
Then add this sequence six times:
- 1 turquoise round + 1 silver round
Finish with:
- Spacer bar hole
- 1 silver bead
- 23 wood rondelles
- Spacer bar hole
- 1 silver bead
Close with a simple loop.
Step 3: Create the Second Layer
Using the second wire, repeat the process but string through the second holes of the spacer bars. Adjust bead counts slightly to balance the design.
Step 4: Build Out the Bracelet
Continue alternating like this:
- Odd-numbered wires → use Step 2 pattern
- Even-numbered wires → use Step 3 pattern
Work through all eight holes of the spacer bars until your bracelet is full and layered.
Step 5: Secure the Ends
Once each wire is finished, form a loop with round-nose pliers to lock in the beads. Adjust and tighten as needed for an even, professional look.
Tips for Success
- Use memory-wire cutters only—regular pliers can get damaged.
- Mix in different bead colors for a custom variation.
- Keep loops consistent at the ends for a polished finish.
Final Result
You’ll have a stunning multi-strand turquoise and wood memory wire bracelet with shimmering silver accents—perfect for layering with other bangles or wearing as a standalone statement piece.
Resources: Most materials are available at Michaels, Country Beads, or your local bead shop.
Explore more wire bracelet tutorials here:
How To Make Your First Wire-Wrapped Bracelet with Beads
How to Make a Simple Beaded Wire Bracelet

